ECG and Cardiac Pulse
Objectives:
- To measure finger blood flow in order to define systole, diastole, pulse, and the cardiac cycle.
- To relate the electrical activity of the ECG to the physical flow of blood through the body.
- To measure the normal length of the cardiac cycle, and the relative pressure and flow changes occurring during the cycle.
- To use the stethoscope to osculate heart sounds and to relate heart sounds to cardiac cycle events.
- To demonstrate the thoracic locations where the first and second heart sounds are most accurately ausculated.
- To accurately determine a subject's apical and radial pulse.
Materials:
Group Supplies:
· self-adhesive, pre-gelled, disposable ECG electrodes
· reusable leads
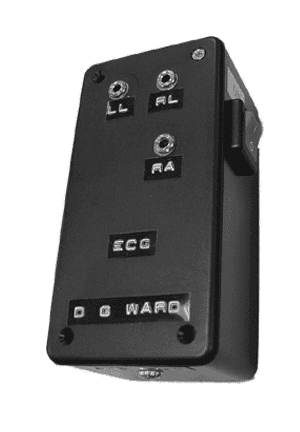
· ECG / EMG preamplifier (D. G. Ward) (set to record activity within a range of 30-1,000 Hz., with a gain of 2,000)
· Stethoscope
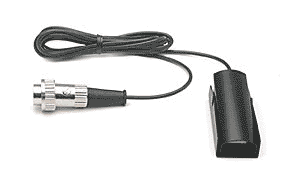
· Infrared plethysmographic finger pulse transducer
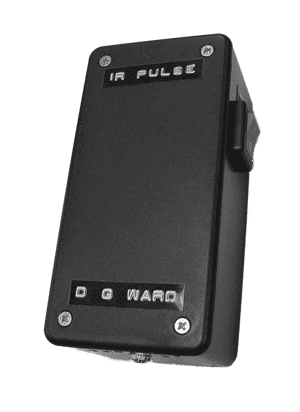
· IR pulse preamplifier (D. G. Ward)
· Digital to analog converter (Dataq, DI-154)
· Computer with display software (Windaq and Windaq Browser)
Lab Supplies:
· Alcohol swabs
Methods and Results
ECG
The preamplifier for ECG / EMG is identified as follows. For each set of measurements described below one electrode is plugged into LL and the other electrode is plugged into RA. A third, indifferent electrode is plugged into RL. This provides for a lead II recording of ECG

- Attach an electrode to the anterior surface of each forearm, about 2 to 3 in, above the wrist, and secure them with rubber straps. In the same manner, attach an electrode to each leg, approximately 2 to 3 in. above the medial malleolus (inner aspect of the ankle).
- Attach the appropriate tips of the patient cable to the electrodes. The cable leads are marked RA (right arm), LA (left arm), LL (left leg), and RL (right leg, the ground).
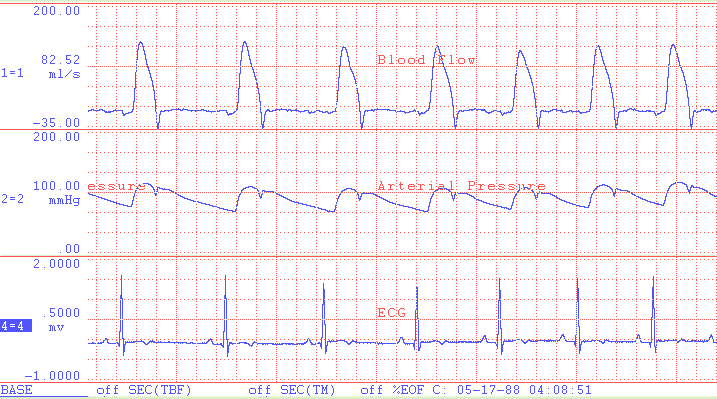
Display the ECG on the computer screen and note the P, QRS and T waves. Estimate the heart rate based on the interval between the R waves. Measure the QRS duration and the QT interval. Record these data in Table 1
Finger Pulse
The instructor will demonstrate the method of setting up the instrumentation for measuring finger blood flow.
The amplifier for conditioning signals from the IR pulse transducer is labeled IR pulse and is identified as follows.

The IR pulse transducer is identified as follows.

Display the finger pulse on the computer screen and note the systolic and diastolic flow changes. Estimate the heart rate based on the interval between the peaks of the sequential pulses. Measure the duration of the pulses and the time between pulses. Record these data in Table 2.
Continue to measure the ECG and finger blood flow and determine the time delay between the QRS complex and the peaks of the blood flow pulses. Record these data in Table 3.
Table 1 Parameters of ECG
|
QRS duration |
Q-T interval |
R-R interval |
Calculated Heart Rate |
|
|
|
|
|
|
|
|
|
|
|
|
|
|
|
|
|
|
|
|
|
|
|
|
|
|
Average= |
Average= |
Average= |
Average= |
Table 2 Parameters of Finger Pulses
|
Duration of Pulses |
Time between Peaks of Pulses |
Calculated Heart Rate |
|
|
|
|
|
|
|
|
|
|
|
|
|
|
|
|
|
|
|
|
|
Average= |
Average= |
Average= |
Table 3 Correspondence between ECG and Finger Pulses
|
Time between Q wave and beginning of Pulse |
Time between Q wave and Peak of Pulse |
|
|
|
|
|
|
|
|
|
|
|
|
|
|
|
|
Average= |
Average= |
Sample Blood Flow and ECG

Heart Sounds
- Obtain a stethoscope and some alcohol swabs.
- With an alcohol swab, clean the ear-pieces of the stethoscope. Allow the alcohol to dry. Notice that the ear-pieces are angled. For comfort and best auscultation, the earpieces should be angled in a forward direction when placed into the ears.
- Place the diaphragm of the
stethoscope on your partner's thorax, just to the sternal side of the left
nipple at the fifth intercostal space, and listen carefully for heart
sounds. The first sound will be a longer, louder (more booming) sound than
the second, which is short and sharp. After listening for a couple of
minutes,
time the pause between the second sound of one heartbeat and the first sound of the subsequent heartbeat.
How long is this interval? ________Sec.
How does it compare to the interval between the first and second sounds of a single heartbeat? - To differentiate individual valve sounds somewhat more precisely, listen to the heart sounds over specific thoracic regions.
Sounds of the AV Valves (First Heart Sound)
As a rule, the mitral valve closes slightly before the tricuspid valve. You can hear the mitral valve more clearly if you place the stethoscope over the apex of the heart, which is at the fifth intercostal space, approximately in line with the middle region of the left clavicle. Listen to the heart sounds at this region; then move the stethoscope medially to the right margin of the sternum to auscultate the tricuspid valve. Can you detect the slight lag between the closure of the mitral and tricuspid valves?
There are normal variations in the site for "best" auscultation of the tricuspid valve. These range from the right sternal margin over fifth intercostal space to over the sternal body in the same plane, to the left sternal margin over the fifth intercostal space. If you have difficulty hearing closure of the tricuspid valve, try one of these other locations.
Sounds of the Semilunar Valves (Second Heart Sound)
Again there is a slight dysynchrony of valve closure; the aortic semilunar valve normally snaps shut just ahead of the pulmonary semilunar valve. If the subject inhales deeply but gently, filling of the right ventricle will be delayed slightly (due to the compression of the thoracic blood vessels by the increased intrapulmonary pressure); and the two sounds can be heard more distinctly. Position the stethoscope over the second intercostal space, just to the right of the sternum. The aortic valve is best heard at this position. As you listen, have your partner take a deep breath. Then move the stethoscope to the left side of the sternum in the same line; and auscultate the pulmonary valve. Listen carefully; try to hear the "split" between the closure of these two valves in the second heart sound.
Finger Pulse and Heart Sounds
Palpation of the Pulse
Superficial Pulse Points
The pulse may be felt easily on any superficial artery when the artery is compressed over a bone or firm tissue. Palpate the following pulse or pressure points on your partner by placing the fingertips of the first two or three fingers of one hand over the artery. It helps to compress the artery firmly as you begin your palpation and then immediately ease up on the pressure slightly. In each case, notice the regularity of the pulse, and assess the degree of tension or amplitude.
Common carotid artery: at the side of the neck
Temporal artery: anterior to the ear, in the temple region
Facial artery: clench the teeth, and palpate the pulse Just anterior to the masseter muscle on the mandible (in line with the corner of the mouth)
Brachial artery: in the antecubital fossa, at the point where it bifurcates into the radial and ulnar arteries
Radial artery: at the lateral aspect of the wrist, above the thumb
Digital artery: on the palm side of the digits (This should correspond to the pulse measured with the IR pulse transducer.)
Femoral artery: in the groin
Popliteal artery: at the back of the knee
Posterior tibial artery: just above the medial malleolus
Dorsalis pedis artery: on the dorsum of the foot
Which pulse point had the greatest amplitude?
________________________________________________________________________
Which the least?
________________________________________________________________________
Can you offer any explanation for this?
________________________________________________________________________
Because of its easy accessibility, the pulse is most often taken on the radial artery. With your partner sitting quietly, practice counting the radial pulse for 1 minute. Make three counts and average the results.
count 1 _______
count 2 _______
count 3 _______
average _______
How does this average compare to the pulse rate determined with the IR Pulse transducer?
Apical-Radial Pulse
With the subject sitting quietly, one student, using a stethoscope, should determine the apical pulse rate while another simultaneously counts the radial pulse rate. The stethoscope should be positioned over the fifth left intercostal space. The person taking the radial pulse should determine the starting point for the count and give the stop-count signal exactly 1 minute later. Record your values below.
apical count _______beats/min
radial count _______ pulses/min
pulse deficit _______ /min
Speculate as to why the apical pulse may not be the same as the radial pulse.
© David G. Ward, Ph.D. Last modified by wardd 23 May, 2006